

My next article will likely focus on the Cloud Practitioner Exam. Having recently completed the AWS Certified Cloud Practitioner CLF-C02 course, I'm now gearing up to tackle the AWS Cloud Practitioner certification exam to further solidify my understanding 📝💻☁️😀
While preparing for my Cloud Practitioner Exam, I've decided to engage in hands-on tutorial experiences to merge the concepts with practical application. Specifically, I've chosen to explore creating a Continuous Delivery Pipeline that will automatically deploy my web application whenever there's an update to the source code.
It's worth mentioning that since I work with GitHub on a daily basis, I'll make a note of the following: ensure you have a GitHub account set up, Git installed, and an AWS account ready to go.
AWS Services I used to create the Continuous Delivery Pipeline:
AWS Elastic Beanstalk
AWS CodeBuild
AWS CodePipeline
Before I proceed, let me share important information regarding these services mentioned above:
AWS Elastic Beanstalk:
AWS Elastic Beanstalk is a service for deploying and scaling applications and services without the need for provisioning and managing infrastructure. Elastic Beanstalk handles patches and updates.

Aws CodeBuild
AWS CodeBuild is a fully managed service that compiles source code, runs tests, and produces ready-to-deploy software packages.
AWS CodePipeline
AWS CodePipeline is a continuous delivery service that enables you to model, visualize, and automate the steps necessary to release software. You can model and configure various stages of the release process. CodePipeline automates the steps required for continuously releasing software changes.

Now, let's recall some fundamental concepts: What is a Continuous Delivery Pipeline?
Continuous delivery is a software development practice in which code changes are automatically prepared for release to production. Building upon continuous integration, continuous delivery deploys all code changes to a testing environment and/or a production environment following the build stage.
This will allow me to have a deployment-ready build artifact that has undergone the testing process.
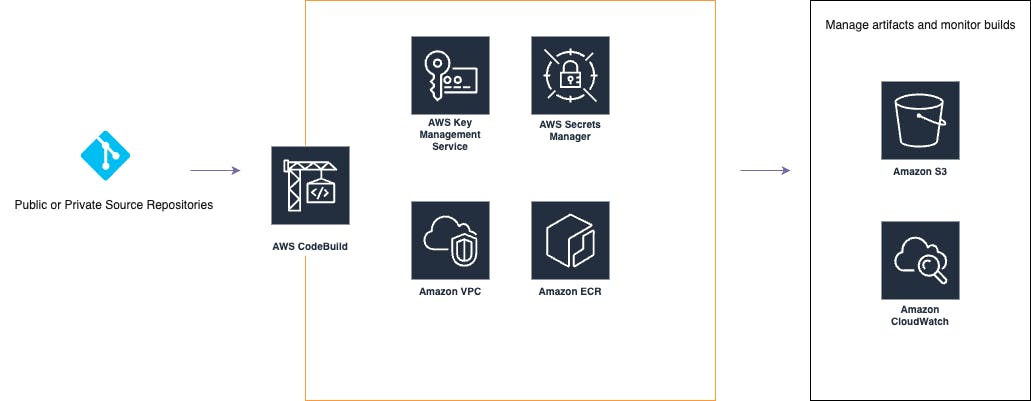
Application Architecture
Application architecture refers to the structure and organization of software applications, including the design principles, components, and interactions that define how the application operates.
Here's my application architecture:

Ready for the hands-on:
First Step: To kick things off, I forked this repository and cloned it to my local machine. By connecting this hosted repository to the pipeline, every new commit I push triggers the build process.
Second Step: Now, it's time to set up an AWS Elastic Beanstalk environment and test the app. I'll utilize this environment alongside the continuous delivery pipeline to deploy the application.
Heading over to the AWS Elastic Beanstalk console, I proceed to create the application. Opting for a Web server environment, I give my app the name "MyFirstDevOpsContinuousPipeline". I select Node.js as the platform, considering the sample code is written in Node.js. I ensure to choose the Single instance (free tier eligible) option. Continuing with the configuration, I set up a new IAM Role for my EC2 Instance profile and select it from the dropdown list. After reviewing all the settings, I hit Submit. A green banner with a checkmark at the top of the environment screen confirms the successful creation of an AWS Elastic Beanstalk application and its deployment to an environment. To verify if the app is deployed and functioning correctly, I check the URL under the domain in the Environment overview section.
Third Step: The third step revolves around building the source code stored in my GitHub repository using AWS CodeBuild. This fully managed service compiles source code, runs tests, and produces software packages ready for deployment. Starting with configuring the AWS CodeBuild project, I head over to the AWS CodeBuild console and create a project. I name it "Build-MyFirstDevOpsContinuousPipeline" and select GitHub as the source provider. Finally, I select the repository name. Ensuring the correct settings include Managed Image selected, Amazon Linux chosen from the OS dropdown, Standard selected from the Runtime dropdown menu. Always use the latest image for this runtime version selected for Image version, Linux chosen for Environment type, and New service role selected. After ensuring all settings are correct, I create a Buildspec file for the project, a collection of build commands and related settings in YAML format that CodeBuild uses to run a build.
I select "Insert build commands" and replace the current Buildspec with the following code:
version: 0.2
phases:
    build:
        commands:
            - npm i --save
artifacts:
    files:
        - '**/*'
After configuring the Buildspec file, I proceed to create the build project. To test the CodeBuild project, I simply click on the "Start build" button. The build process will start, and a build log will be displayed. After a few minutes, the build should be completed. If everything went smoothly, a "Succeeded" message should display, confirming that the build was successful!
Creating the Continuous Delivery Pipeline
Now, it's time for me to set up the continuous delivery pipeline, allowing for integration of source code changes, building with AWS CodeBuild, and deployment to AWS Elastic Beanstalk.
Creating a New Pipeline: I head over to the AWS CodePipeline console and initiate the creation of a new pipeline. Name it "Pipeline-MyFirstDevOpsContinuousPipeline."
Configuring Source Provider: I select GitHub as the source provider and connect to GitHub, authorizing aws-codesuite. Finally, I choose the repository name and enable GitHub webhooks.
Selecting Build Provider: For the build provider, I choose AWS CodeBuild. I ensure the region is set to US West (Oregon) and select "Build-MyFirstDevOpsContinuousPipeline" as the project name.
Configuring Deployment: For deployment, I select AWS Elastic Beanstalk. Set the region to US West (Oregon) and choose the application name "MyFirstDevOpsContinuousPipeline" along with the environment "env-MyFirstDevOpsContinuousPipeline."
Adding Review Stage: To add a review stage for manual approval, I navigate to the AWS CodePipeline console. Select "Pipeline-MyFirstDevOpsContinuousPipeline" for editing and insert a "Review" stage between the Build and Deploy stages. I name it "Review" and add an action named "manual_review," selecting Manual Approval as the action provider.
Testing the Pipeline: Once the pipeline is set up, I run a test by making changes to the code and pushing them to GitHub. I noticed the stages switching from blue to green in the AWS CodePipeline console. When the Review stage turns blue, I click on the white Review button to review and approve the changes before deployment to AWS Elastic Beanstalk.
Viewing Changes: To view the changes in my application, I navigate to the URL provided in the Elastic Beanstalk console!
Cleanup: After testing, I ensure to clean up resources:
I delete the "MyFirstDevOpsContinuousPipeline" application from the AWS Elastic Beanstalk console.
I delete the pipeline from the AWS CodePipeline console.
I clean up pipeline resources from the Amazon S3 Bucket by first emptying the buckets and then deleting them.
Finally, I delete the build project in the AWS CodeBuild console.
Conclusion: Setting up this continuous delivery pipeline has been an exciting journey. It not only automates processes but also allows for thorough review before deployment, providing greater control over the workflow.
Thank you for reading, and see you in the next post!